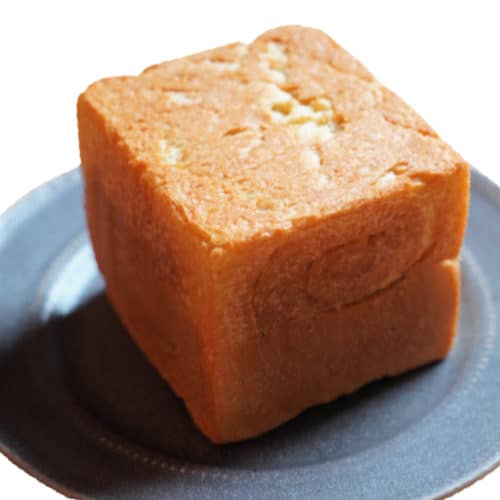
Have you ever had a loaf of bread shaped into a perfect cube? Me neither! Though I have had Japanese shokupan which is much the same thing, just in more of a traditional rectangular shape.
I’ve also made Hokkaido milk bread which is also a Japanese-style shokupan, often used for sandwiches or toast. Unlike the Hokkaido milk bread which has a raised top, however, this bread is a prefect cube.
So in order to get the perfect cube, you’ll need a special square baking tin called a mini Pullman loaf pan (Amazon affiliate link) which I happened to have from another bread experiment I did, here.
The original recipe comes from the youTube channel Apron. And in order to make this bread, we’ll be utilizing a special
technique that increases the moisture content in this loaf.
We’ll be making a tangzhong, a cooked paste of flour and water and milk. This added moisture will extend the life of your bread, allowing it stay soft longer, preventing it from tasting stale.
So let’s get baking!

Milk Bread Cube
Equipment
- oven
- 10 cm square Pullman loaf pan
Ingredients
Paste
- 25 g. bread flour
- 40 ml. whole milk hot
Dough
- 140 ml. whole milk lukewarm
- 1 tbsp. honey
- 2.5 g. instant yeast
- 240 g. bread flour
- 15 g. granulated sugar
- 2.5 g. Kosher salt
- 30 ml. whipping cream
- 15 g. butter unsalted, room temperature
Instructions
Flour Paste
- In a microwave-safe bowl combine the flour and hot milk. Stir well. Microwave for 10 seconds to form a very thick paste. Stir to soften.
Dough
- In a small bowl combine the lukewarm milk, honey, yeast. Stir to dissolve. Allow to rest 5 minutes.
- In a separate large bowl, whisk together the flour, sugar, and salt.
- Tear the flour paste into small pieces and add to the dry mixture.
- Add the yeast mixture and whipping cream. Mix into a shaggy dough.
- Turn the dough out and knead (3-5 minutes) until the surface of the dough is smooth.
- Flatten the dough and add the butter. Fold the edges over the butter and knead to incorporate.
- Using cupped hands shape the dough into a ball with a tight skin.
- Place the dough into a lightly oiled bowl and cover with plastic wrap. Place in a warm spot for 1 hour or until the dough doubles in volume.
- Invert the dough on to a countertop and gently de-gas pressing it into a disk. Divide into 2 equal pieces.
- Take one piece of dough and draw up the sides to form a parcel. Turn it over with the seam on the bottom and use cupped hands to shape it into a tight ball. Repeat with the remaining dough ball.
- Cover loosely with plastic wrap or a damp towel and allow the dough to rest for 15 minutes.
- While the dough is resting, use a pastry brush to butter the inside and lid of the loaf pan.
- Use a rolling pin to de-gas the dough and roll into a 8-9" oval. Fold the sides of the dough allowing the edges to meet in the center. Gently roll the dough out again until it's ~11"-12".
- Thin out the one of the short sides of the dough by pinching it out. At the opposite end, roll the dough up tightly. Pinch to seal.
- Place the rolled dough seam side down into the buttered pan. Use the back of your knuckles to gently press the dough down.
- Cover and allow to rise 1 hour or until doubled in size.
- Preheat oven to 370˚F/190˚C.
- Bake for 30-35 minutes.
- Unmold from pan and allow to cool before slicing.
Looks delicious!
What other pan could I use?
A loaf pan would be just fine.
mine, aside from the bottom side, all sort of caved in…argh. any idea why?
Could be different things – not enough or too much yeast… over-proofed dough, temperature of oven too high…
I only have 1 mini square pan. For the second dough, do I leave it in the fridge or let it proof in room temperature on the final rise?
As for caving in, I’ve seen recipes that say when you remove from oven, tap the pan on the counter a couple time to prevent this. I’m about to make a loaf, so I haven’t tested it in the past or this time, & my suggestion is going on blind faith.
First time I made it it came out horrible-ly. It smelled great but was so hard and inedible. My partner joked about using it as a door stop.
Since then I had made other milk bread recipes and their doughs were much wetter …so I wondered if maybe I was off with my measurements when I made Emmy’s version. So I tried again… and once again when I was mixing my wet with my dry ingredients – it felt too dry like the first time. This time I improvised and added at least another 1.5 oz of liquid and that seemed to fix the issue that I had during my first go at the recipe. Adding extra moisture made it feel lilke the consistency of the other versions of milk bread and made it much easier to work with.
Additionally adjustments made…
I put both halves in the cube and that worked better than baking it as two separate cubes. Plus I only had one cube mold. I also decreased the overn o 355F and increased the bake time to 45min.
Thank you for the initial recipe.
So glad you figured it out!