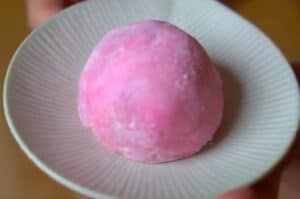
Ever since trying mochi brownies for the first time at Two Ladies Kitchen in Hilo, Hawaii, the scrumptious mochi consumed my thoughts. Not only did the confection have a beautiful hot pink chewy mochi exterior, but the rich, decadent chocolate brownie center was sublime. I filmed a taste test if you’d like to see my first impression.

Even upon first tasting the mochi brownie, I knew I had to replicate it. To simplify things, I started with a brownie recipe from King Arthur Baking Company. It’s a solid, reliable recipe that yields brownies with that cakey/fudgy balance, absolutely perfect for the interior of the mochi. From there, I prepared the mochi in my Toshiba microwave oven using the same mochi recipe as Cooking with Dog. It’s a shortcut to mochi since it uses sweet glutinous rice flour instead of steamed glutinous rice pounded into a paste, which I did (with the help of a mochi machine) in this video.
Who knows who first thought of this concept, but whoever did — THANK YOU!! As you may know, there are quite a few variations of mochi brownies. Typically, however, rice flour is used instead of all-purpose flour in order to achieve a toothsome, chewy texture. The brownies in this recipe are comparable in feel to mochi ice cream, making them much more fun to eat! (See below the recipe card for the taste test.)

Mochi Wrapped Brownies
Equipment
- microwave
- oven
Ingredients
Brownie Filling
- 4 large eggs
- 1 ¼ cups 106g Dutch-processed cocoa
- 1 teaspoon table salt
- 1 teaspoon baking powder
- 1 teaspoon espresso powder optional but recommended
- 1 tablespoon pure vanilla extract
- 16 tablespoons 227g unsalted butter
- 2 ¼ cups 447g granulated sugar
- 1 ½ cups 180g all-purpose flour
- 2 cups 340g chocolate chips
Mochi Exterior
- ¼ cup + 2 tablespoons Mochiko sweet glutinous rice flour 75g
- 1/3 cup 75g granulated sugar
- ½ cup 100ml water
- Americolor deep pink gel food coloring
- ½ cup 100g potato or cornstarch
Instructions
Brownies
- Preheat the oven to 350°F. Lightly grease a 9″ x 13″ pan. To remove the whole sheet of brownies from the pan at once, grease the pan, line it with parchment, and then grease the paper.
- Add the eggs, cocoa powder, salt, baking powder, espresso powder (if using), and vanilla extract to a bowl. Beat at medium speed for 1 minute or until smooth.
- In a medium-sized saucepan over medium-low heat, or a microwave-safe bowl, melt the butter and sugar together until the butter is completely melted. Then, continue to heat until the mixture is hot (about 110°F to 120°F) but not bubbling and becomes shiny. Add the hot butter and sugar mixture to the egg and cocoa mixture. Stir until smooth.
- Add the flour and chocolate chips. Stir until well combined.
- Transfer the batter to the prepared pan.
- Bake the brownies for 28 to 32 minutes. The brownies are done when the edges are set, and the center looks moist but not undercooked. To ensure that the center isn’t undercooked, insert a tester in the center and flick the surface of the brownies up a bit to ensure that there are moist crumbs instead of raw batter underneath the surface.
- Remove the brownies from the oven and transfer them to a cooling rack. The brownies must cool completely before wrapping them in mochi.
- Wrap any leftovers and store them at room temperature for 5-6 days, or freeze them for longer storage.
Mochi
- Whisk the glutinous rice flour and sugar in a heat-safe bowl, then add the water. Mix until smooth.
- Stir in a small drop of pink food coloring.
- Dip a pastry brush in water and brush down the sides of the bowl so there are no dry bits of flour.
- Loosely cover the bowl with plastic wrap and microwave in a 600-watt microwave for 2 minutes. If your microwave’s wattage is higher, adjust the time accordingly.
- Remove from the microwave and stir. If it is still slightly opaque, microwave for another minute or until it achieves a bouncy consistency.
- Stir with a wooden spatula dipped in water to build up the mochi’s elasticity.
- Transfer the mochi to a baking tray dusted with potato or cornstarch and form it into a log.
- Cut into 5 equal-sized pieces.
- Shape each piece into a little ball.
Assembly
- Cut 5 (1-inch) squares from the brownies. Save the rest to enjoy later.

- Round out each brownie square.
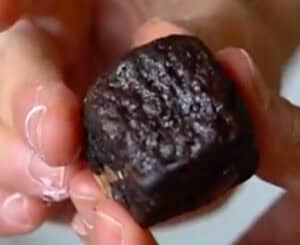
- Wrap the mochi around each brownie bite.


Notes
Nutrition
How Do They Taste?
Think traditional brownie meets mochi. But no bean paste! 😆 Every bite offers a perfect balance of subtly sweet mochi and buttery chocolate. The tender yet chewy exterior contrasts beautifully with the fudgy, cakey brownie, making them super satisfying. The brownie itself has a wonderful consistency, with the crunchy bits of chocolate chips further enhancing the experience.
Two thumbs up from me! 👍🏼👍🏼